Overview
Engineering Success is a core component of the iGEM competition, encouraging teams to apply engineering thinking and strategies to address practical problems both within and beyond their projects. Throughout our months of work, we repeatedly went through the engineering cycle—Design → Build → Test → Learn—as we constructed and refined solutions. In this section, we share two case studies that highlight our team’s experiences and insights in achieving engineering success.
Case A: The Construction of Plasmids
The theme of our project was the construction of a plasmid containing the endogenous CPN60C gene from Chlamydomonas reinhardtii. This plasmid was then transformed into new strains of C. reinhardtii that overexpressed CPN60C, thereby enhancing their heat stress tolerance, so that maintaining their photosynthetic function under high temperature. This improvement promoted more effective carbon dioxide fixation through the improved survivability, contributing to the exploration of a green and environmentally friendly solution to the global warming crisis. The successful construction of the CPN60C plasmid was the cornerstone of our project’s continued development.
Our project also underwent a small shift in focus. Initially, we attempted to target the endogenous gene LCIB, but later identified CPN60C as a more suitable target. This adjustment did not affect the plasmid construction process or the engineering cycle described below, so it will not be elaborated on separately.
The overall engineering process for Case A is summarized in the figure below:

Design – Round 1: Free Construction of a Plasmid Containing the CPN60C Gene
Our team began with a clear strategy: to construct a functional CPN60C expression cassette by combining a well-established promoter and terminator with the endogenous CPN60C gene, and then inserting this cassette into a plasmid backbone that had been extensively validated in previous research and proven suitable for expression in Chlamydomonas reinhardtii.
Following the instruction of our advisor, Dr. Brace, the students first brainstormed and drafted a preliminary plasmid design based on literature research. Dr. Brace then refined and optimized this draft. The final plasmid design included the PsaD promoter, CPN60C CDS, and RBCS2 terminator, which together formed a functional expression cassette inserted into the pOpt_Clover_Paro plasmid backbone.
The complete plasmid map is shown below:

Of which, the PsaD promoter and RBCS2 terminator are both widely used in Chlamydomonas reinhardtii research. Their high efficiency in transgenic experiments has been well demonstrated. The CPN60C CDS sequence was obtained from the Phytozome database (JGI, n.d.). Since it is an endogenous gene, codon optimization was not required.
Build – Round 1: Scarce Backbone, Excessively Long Sequence
However, the design above quickly ran into unexpected difficulties during the construction phase. We knew that the pOpt_Clover_Paro plasmid backbone was widely used in Chlamydomonas reinhardtii and could be purchased from the Chlamydomonas Resource Center in the United States (ChlamyCollection, n.d.). We therefore assumed it would be equally easy to obtain in China. In reality, this plasmid backbone is a niche product with no public procurement channels in China. Moreover, our lab conditions and the technical expertise of our high school team were not sufficient for us to synthesize such a long plasmid backbone ourselves. Purchasing it from the US was also not feasible due to the policy constraints of Chinese customs on the importation of microorganisms. The delivery time from the US to our lab was completely unpredictable. When we contacted the Chlamydomonas Resource Center, we were told it might take weeks, months, or even longer.
We then reached out to the gene synthesis companies to help us synthesize the entire sequence, including the backbone. The feedbacks were discouraging: given the 11,763-bp length of the plasmid, the risk of failure was significant. Commercial companies estimated a synthesis cycle of more than two months (in reality, likely much longer), and the cost was far beyond our budget.
As a result, we abandoned our initial plan and entered the second round of design.
Design – Round 2: Shortening the Sequence, Supported by Scholars
The central goal of the second round was to minimize the total sequence length while retaining a functional expression cassette. To achieve this, we:
- Replaced the promoter and terminator with the shorter HSP70A–RBCS2 fusion promoter and RBCS2 terminator from the iGEM Registry (shorter than the traditional versions).
- Switched the backbone to pKS-aphVIII-lox, a widely used C. reinhardtii plasmid backbone with paromomycin resistance and a shorter sequence.
This reduced the full plasmid length to 6,928 base pairs, with an estimated synthesis time of 5–6 weeks, it was more affordable within our budget and project timeline. We designated this design as Plasmid C.
At the same time, we considered another path: reaching out to domestic scholars. Since many labs in China conduct C. reinhardtii research, perhaps they already had the plasmid backbones we needed. Fortunately, two groups responded generously:
- Dr. Lei Zhao and Dr. Yuyong Hou from the Tianjin Institute of Industrial Biotechnology, China Academy of Science.
- Dr. Kaiyao Huang and Dr. Lian Ye from the Algae and Biomanufacturing Research Center, Institute of Hydrobiology, China Academy of Science.
Thanks to their help, we ended up with three plasmid designs:
Plasmid A: PsaD promoter + CPN60C CDS + PsaD terminator, embedded in a backbone with a hygromycin resistance cassette. Dr. Hou donated the backbone, optimized the expression cassette design, the promoter, and the terminator, and assisted us to construct the plasmid.

Plasmid B: HSP70A–RBCS2 promoter + CPN60C CDS + RBCS2 terminator, embedded in a backbone with a paromomycin resistance cassette, donated and optimized by Dr. Huang and Lian Ye’s team; constructed via insertion by Genewiz.
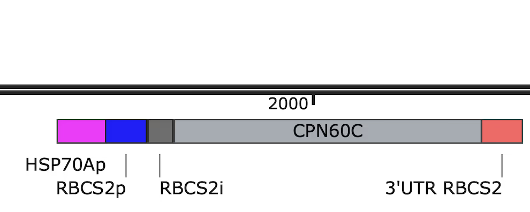
Plasmid C: HSP70A–RBCS2 promoter + CPN60C CDS + RBCS2 terminator, embedded in the pKS-aphVIII-lox backbone with paromomycin resistance; which should be fully synthesized by Tsingke Biotechnology.

In the following text, we refer to these as Plasmid A, Plasmid B, and Plasmid C.
Build – Round 2: Good and Bad News
With the generous support of researchers, plasmid construction was no longer a nightmare.
Plasmid A was constructed with the help of Dr. Hou.
Plasmid B was built using the backbone donated by Dr. Huang and Ye.
However, our original design, Plasmid C, remained problematic. Although its length had been shortened to under 7,000 base pairs, full-sequence synthesis still proved too challenging. Despite repeated attempts, including splitting them into fragments, low-temperature assembly, re-splitting, and changing competent cells, the synthesis could not be completed within our experimental timeline.
Testing: Wet Lab vs. Dry Lab
After this build phase, with both successes and setbacks, we had Plasmids A and B successfully constructed, while Plasmid C failed to be built but still provided insights. We adopted different testing strategies:
- For Plasmids A and B, we moved to the wet lab (see our “Experiments” page). After several weeks of lab work, we successfully transformed wild-type C. reinhardtii CC-124 and the lab strain UVM4 with Plasmids A and B. Using resistance markers, we identified potential positive transformants, which were confirmed by PCR, qPCR, and heat stress growth assays.
- For Plasmid C, which failed to construct, we used modeling to predict the probability of successful CPN60C expression in C. reinhardtii. The results suggested that, if synthesized, the plasmid would likely succeed in expressing the gene. Details are provided on our “Model” page.
Learn: Insights from Every Step
The “Learn” process has been one of comprehensive reflection. From design to build to testing, each stage gave us insights for improvement. We will apply these lessons in the next round of work and hope other teams can learn from our experience as well.
Design phase: It is essential to assess the team’s technical capabilities before designing plasmids and to confirm reliable sources for all components, especially larger backbones. Since our major exploration were focused on English-language literature, and our scientific advisor is US-based while our team is based in China, we overlooked key differences in available resources and processes. In the future, we will prioritize this. For Plasmids A, B, and C, we will also consider optimizations such as adding introns or adjusting codons to improve transcription and translation.
Build phase: Our experience shows that, given our limited technical skills, attempting to synthesize a long plasmid in its entirety is not a wise strategy in terms of time, cost, or likelihood of success. The risk of synthesis failure increases exponentially, not linearly, with sequence length.
Test phase: In testing Plasmids A and B, we identified areas for optimization in algal culture and expansion, electroporation transformation, resistance screening, and PCR. For example:
- C. reinhardtii has strict requirements for light, temperature, and circadian rhythm, which must be flexibly adjusted.
- Preliminary experiments, such as confirming antibiotic concentrations, help prevent wasted resources.
- Aseptic techniques are crucial throughout, especially for strain propagation, electroporation, and plating.
Finally, since CPN60C is a mitochondrial chaperone protein that consumes ATP, it may burden algal growth under non-stress conditions. This calls for a more conservative preservation strategy for electroporated strains, particularly UVM4 strains with cell wall defects.
Case B: The Construction of an Algae Incubator
Chlamydomonas reinhardtii is highly sensitive to light, temperature, and circadian rhythms. Compared to many other plants, it is also relatively fragile under laboratory conditions. As a result, cultivating algae became the very first challenge in our early lab work.
Ideally, cultivating C. reinhardtii requires an incubator with built-in, controllable lighting. However, such incubators are costly and have limited applications. Our lab did not have this equipment, and purchasing additional devices was beyond our team’s budget. Therefore, we adapted to our local circumstances and set out to construct a custom-made incubator with controllable lighting.The overall engineering process for Case B is summarized in the figure below:

Cycle 1
Design: Full-Spectrum LED Light + Traditional Incubator
The core of the design was to adapt a traditional incubator to provide controllable lighting suitable for the growth of Chlamydomonas reinhardtii. Starting from first principles, we quickly settled on a design solution: adding a suitable incubation lamp to the traditional incubator.
After researching commercially available lamps, we selected a full-spectrum LED desk lamp with both red and blue wavelengths. Its full-spectrum light made it suitable for growing C. reinhardtii. As a cold light source, LEDs do not generate excess heat that might affect algae growth. Its size allowed it to fit inside the incubator while providing relatively even illumination throughout. We also added an external rotary switch to control light intensity and circadian rhythm without disturbing the algae’s growth.
Build: First Version of the Homemade Illuminated Incubator
The process of building our custom illuminated incubator went smoothly. The full-spectrum LED desk lamp fit the incubator’s dimensions perfectly and provided uniform illumination inside. The external rotary switch also worked as expected. Overall, the setup met our design goals.

Test: First Batch of Algae Cultures and Unexpected Temperature Issues
We began cultivating our first batch of algae in the custom incubator. For the first few days, both light and temperature were well controlled, and algae expansion proceeded smoothly.
Soon, however, we encountered an unexpected problem: extremely hot weather.
The incubator has a built-in temperature control system that normally maintains a constant 25°C, so we had not considered temperature as a major factor in the initial design. But since our experiments took place during the summer, with outdoor temperatures exceeding 40°C (104°F), the incubator’s cooling system was under greater strain. After a few days, the system nearly failed. The temperature inside the incubator rose from 25°C to 27°C, and eventually reached 31°C—essentially a “sauna” for the fragile algae.

Learn: Incorporating Temperature Control into the Second Round of Design
The results of the first round, along with this unexpected issue, forced us to rethink our design: we had to account for temperature control. We quickly began developing a new solution.
Cycle 2
Design: A “Refrigerator” Illuminated by Full-Spectrum LED Lighting
Our second-round design again followed first principles: meeting the light, circadian rhythm, and temperature requirements for C. reinhardtii was the sole starting point. To address the temperature runaway issue, we devised a simple and cost-effective solution: placing an open rectangular container of ice cubes at the bottom of the incubator. This provided additional cooling and reduced the load on the incubator’s own temperature control system.
Build: Second Version of the Homemade Illuminated Incubator
Like the first version, construction posed no particular difficulties. Through several trials, we adjusted the amount of ice, eventually determining the right volume to support the incubator’s temperature control system without interfering with algae growth.
Test: New Issues with Manual Temperature Control
We resumed cultivating C. reinhardtii in the second version of the incubator. This time, the temperature issue was resolved. With the help of the ice, the incubator maintained a stable 25°C, and the algae grew normally for several days.
However, this manual cooling method introduced new problems. Because of the persistent summer heat, the ice had to be replaced every few hours. This not only made the experiments more tedious, but also caused temperature and light fluctuations each time the incubator door was opened, especially difficult to manage at night.
Learn: Continuing to Solve New Problems
After the second engineering cycle, we entered a new stage of reflection. Using ice to cool the incubator solved one problem but created another: the need for constant manual intervention.
At this point, we began to ask ourselves: Are we limiting our thinking by being tied to the “box” of the incubator? Must everything—from temperature to light control—be managed inside a single box? Or do we really need a box at all?
Cycle 3
Design: The Third Version of the “Homemade Illuminated Incubator”—But Not a “Box”
Building on the second engineering cycle, we returned to first principles and freed ourselves from the constraint of the “incubator” concept. What we truly needed was simply a small space that could reliably control light, temperature, and circadian rhythms, ensuring stable conditions for the growth of Chlamydomonas reinhardtii. Whether it was a box or something else no longer mattered.
We initially considered using a small darkroom, but preliminary research revealed that the air conditioner lacked proper drainage, and condensation could damage the microscope in the room. Ultimately, we settled on a small room (adjacent to the cell room) equipped with a central climate control system and heavy blackout curtains. This became our third version of the “homemade illuminated incubator.”
Build: Special Arrangement for a Small Room
We specially configured the small room to meet the requirements of a “homemade light-incubator.” First, we repeatedly verified the performance of the room’s central thermostat, using a smart thermo-hygrometer and an app to monitor temperature fluctuations. Second, we added extra layers to the existing blackout curtains to ensure complete darkness during the night cycle. Finally, we placed the full-spectrum LED desk lamp we had originally purchased on the surface where algae cultures were kept, providing relatively even illumination for all strains.

Test: Finally, We Can Cultivate Algae in Peace
The third round of testing went smoothly and ultimately became our final method for cultivating, expanding, and incubating algae strains. The small, improvised darkroom functioned as a large incubator and provided a solid foundation for our entire experimental process.
Learn: Lessons
After three engineering cycles, we finally created a stable and usable homemade light-incubator, enabling the effective expansion of algae strains. At each round of improvement, we often solved one problem only to introduce another. Interestingly, this mirrors the biology of Chlamydomonas reinhardtii: many of its functions are tightly coupled, so improving one function may reduce the efficiency of another, strongly correlated function, leading to a negative overall effect. This was a small but striking example of synesthesia we experienced firsthand.
Nevertheless, the most important lesson from this engineering success story is the value of applying first principles and defining our goals clearly, rather than being constrained by existing options.