Engineering Beyond Boundaries:
Our RDX Journey

Welcome to our step-by-step journey. Guided by the Design-Build-Test-Learn (DBTL) cycle, we approached each phase systematically to tackle our challenges and develop a reliable, innovative solution.
How we did it:
Functional Consolidation
Design
Build


Promoter Replacement and Riboswitch Control
Design


Promoter Optimization
Design

After deep analysis of the constitutive promoter BBa_J23119, we realized that it was too strong for our circuit, in terms of transcriptional activity and in exceeding the host’s cellular capacity. By analyzing all the promoters, we observed a linear relationship between promoter strength and cellular burden (Graph 1). Based on these considerations, we aimed to identify a promoter that would maintain the metabolic burden within an acceptable range while providing medium to high transcriptional activity. Consequently, we narrowed our selection to two candidates for experimental testing: BBa_J23118 and BBa_J23100.
Build

We used Benchling to assemble each promoter into the circuit and literature data was consulted to guide selection and testing for the most suitable promoter for our prototype.
Test

Promoter testing included comparison of both transcriptional strength and associated metabolic burden. As shown in Table 1, both promoters were compared in terms of strength and metabolic burden. BBa_J23118 has medium strength (~56% of J23100) and imposes minimal burden, whereas BBa_J23100 is stronger but causes a significantly higher metabolic burden (20% ± 9.9%).

Graph 1. Analysis of Anderson family promoters according to Austin UTexas (iGEM 2019), showing the relationship between cellular burden and promoter strength.
Table 1. Comparative analysis of promoter strength and associated burden values for BBa_J23100 and BBa_J23118.
| Part | Promoter Strength | Burden Value |
|---|---|---|
| BBa_J23100 | 1.00 | 20.0% ± 9.9% |
| BBa_J23118 | 0.56 | -0.1% ± 3.8% |
Learn

After testing, we determined that BBa_J23118 was more suitable for our prototype. Since our system employs a translational riboswitch, it does not require a promoter with the high transcriptional activity of BBa_J23100, and using J23118 minimizes the metabolic burden while still providing sufficient gene expression for functional performance.
Construct Synthesis
Design
Based on the RDX detection and degradation genetic construct, three genetic circuits were planned for synthesis, varying in riboswitches and ribosomal binding sites (RBS) (Figure 4).

Figure 4. (A) Detection and degradation genetic construct. (B) Full RDX detection and degradation sequence containing a constitutive promoter, both degradation protein gene sequences (BBa_K3857002, BBa_K3670004), amilGFP (BBa_K592010), the synthetic riboswitch described in [3] before every protein-coding sequence, and a terminator. (C) Riboswitch control sequence containing a constitutive promoter, a synthetic riboswitch, amilGFP, and a termination sequence.
Build
The three circuits were sent for synthesis to Integrated DNA Technologies (IDT). However, only the control sequence (Figure 5) was received. The other two circuits were not sent due to stunted colony growth, likely caused by:
- Excessive length of the mRNA transcribed from the constitutive promoter.
- Toxicity resulting from the excess of the XplA and XplB degradation proteins.
Test
Experimental results showed that the control sequence (Figure 5) did not affect colony growth, suggesting that:
- Construct length and constitutive promoter were critical factors.
- An excess of the degradation proteins could be toxic to E. coli.
This led to the formulation of two hypotheses:
- The sequences were too long, causing stress for the bacteria, especially with a constitutive promoter.
- The RDX degradation proteins, XplA and XplB, were too toxic for the bacteria.
Learn
To address these problems, an inducible promoter was selected. Two alternatives from the iGEM Registry of Standard Biological Parts were chosen:
- σ32 Heat Shock promoter (IIT Madras 2008)
- σ38 Stationary Phase promoter
This change allows controlled expression of long or potentially toxic genes, reducing cellular stress and enabling synthesis of the remaining circuits. Five genetic circuits were designed with multiple cloning sites (MCS) in key points to allow modularity between them.
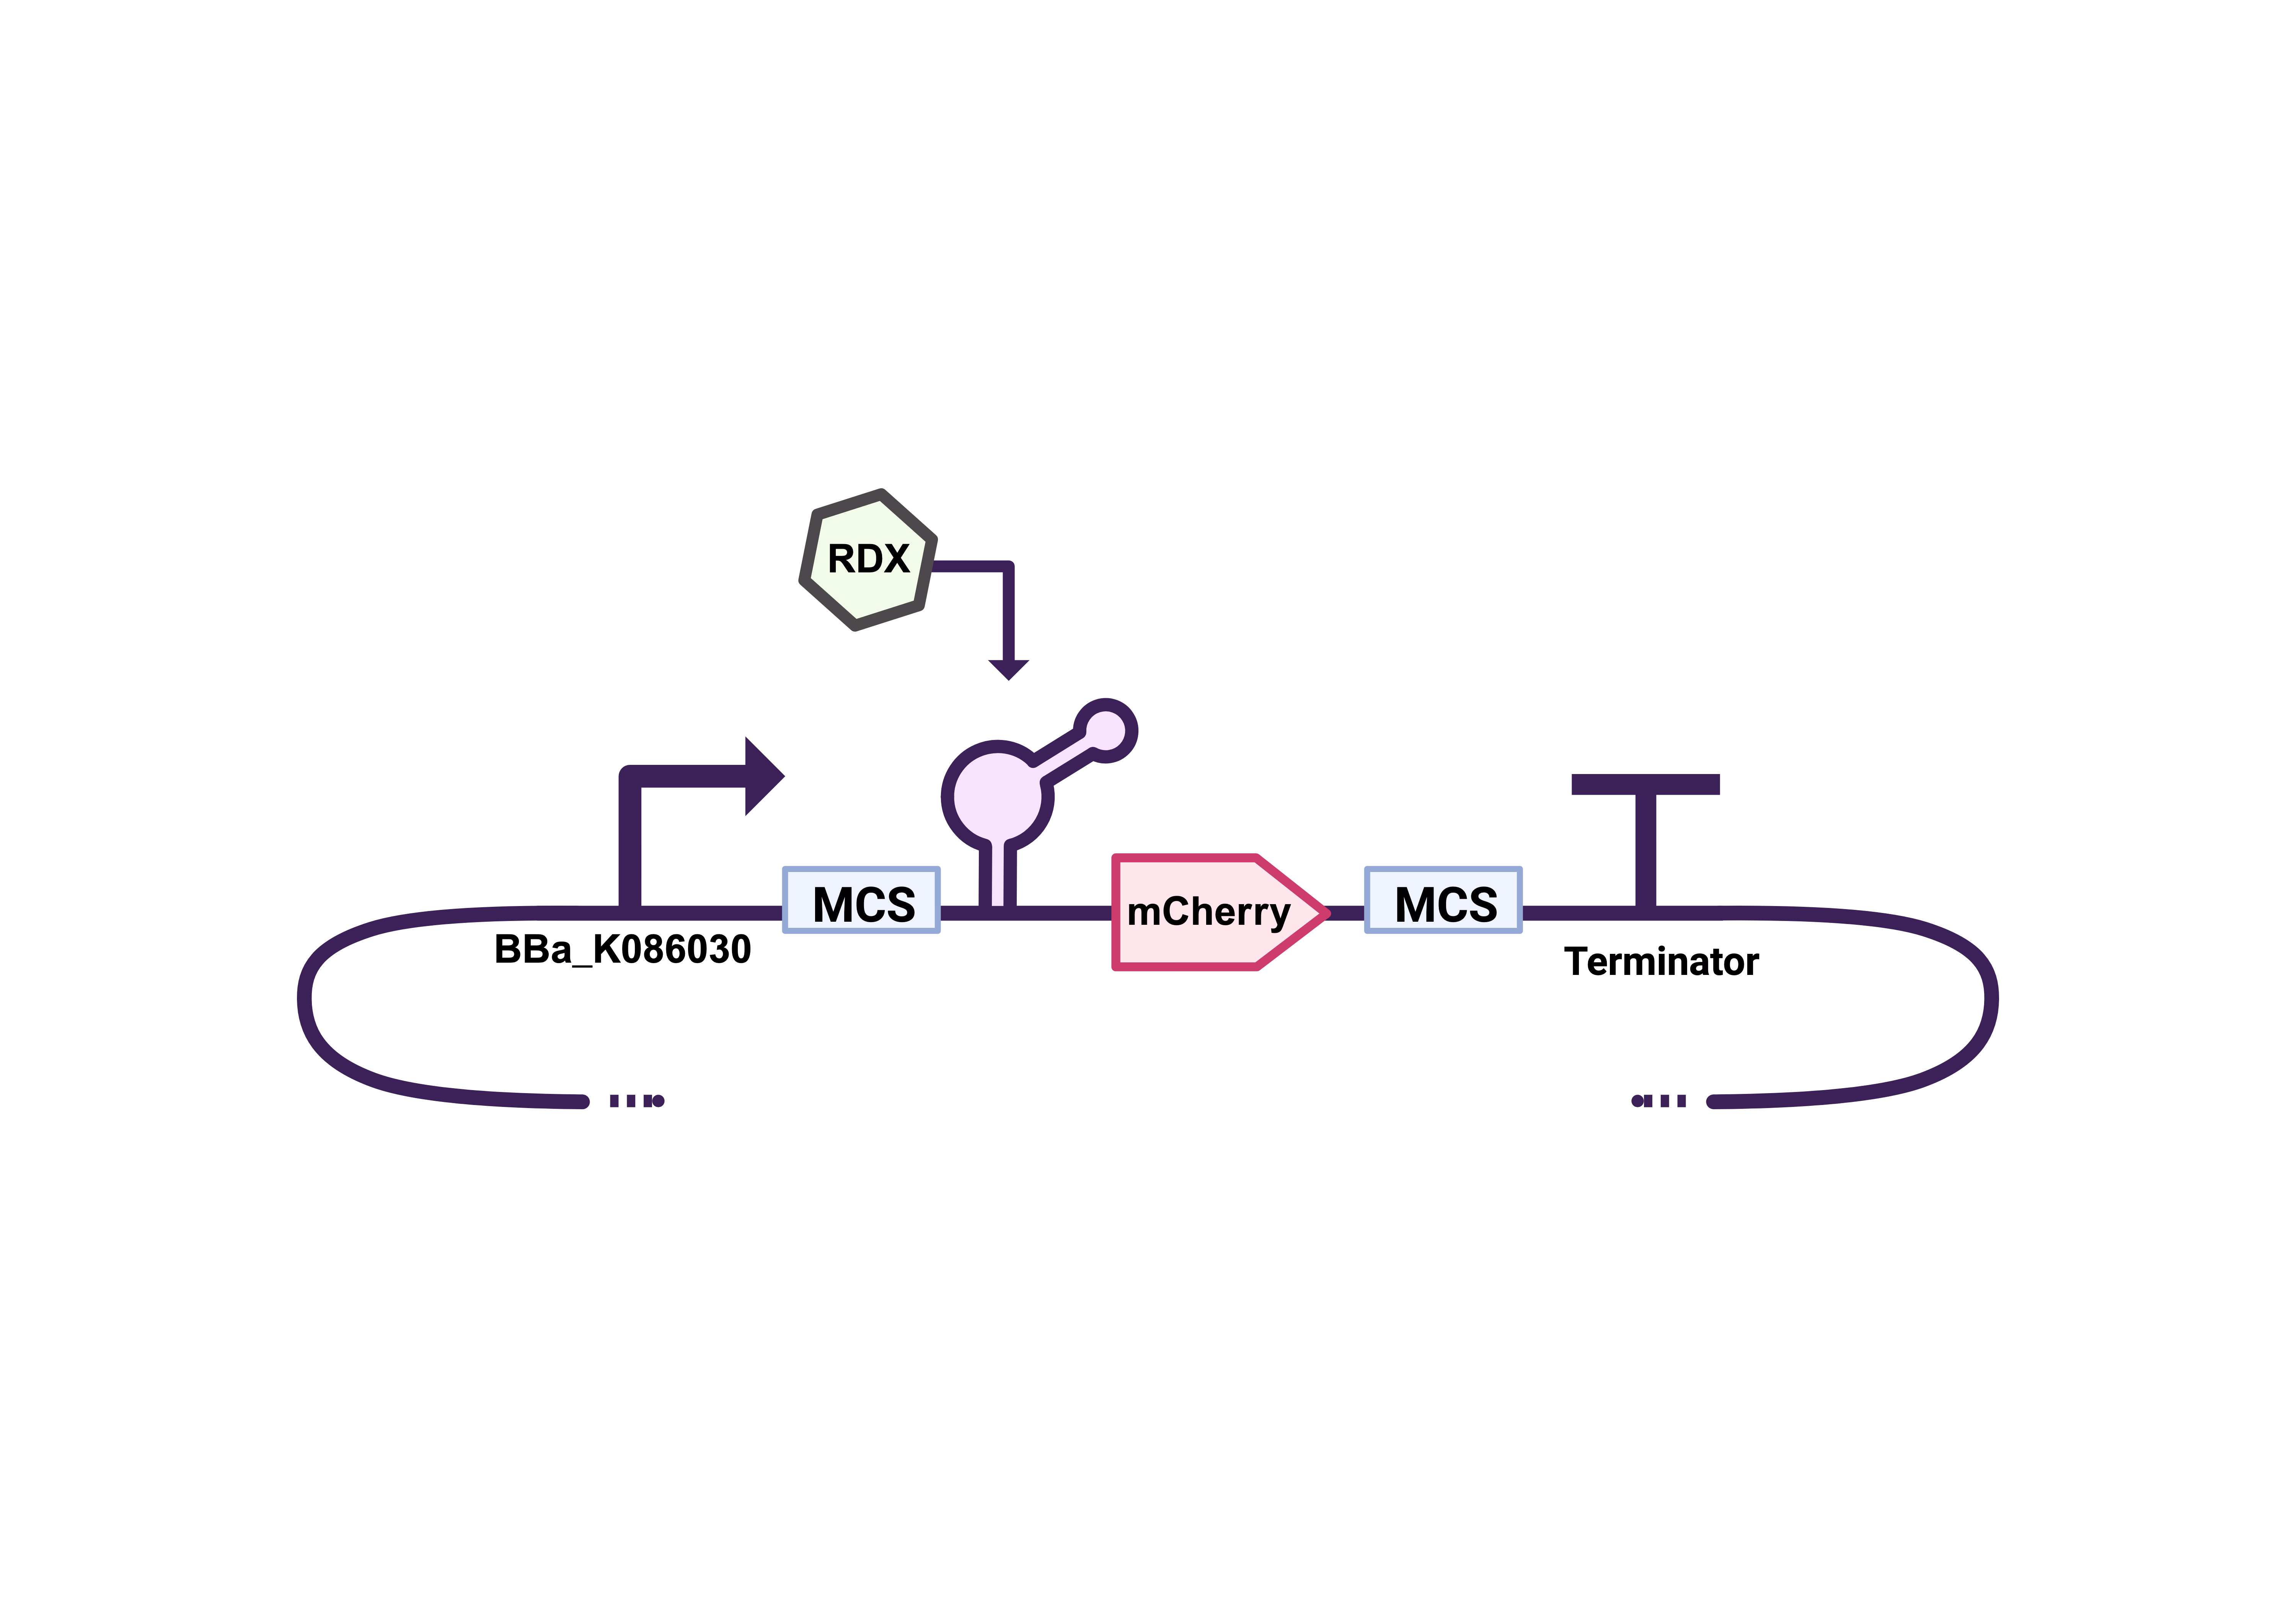
Figure 5: σ38 Stationary Phase inducible promoter, first MCS includes EcoRI and XbaI restriction sites, RDX specific riboswitch, MCherry protein sequence, second MCS includes SpeI and PstI restriction sites ending with BBa_B0010 termination sequence.

Figure 6: σ38 Stationary Phase inducible promoter, first MCS includes EcoRI and XbaI restriction sites, a basic ribosomal binding site (RBS), MCherry protein sequence, second MCS includes SpeI and PstI restriction sites ending with BBa_B0010 termination sequence.

Figure 7: First MCS includes EcoRI, NotI and XbaI restriction sites, followed by the xplB and xplA genes, which encode RDX degradation enzymes, each with the RDX specific riboswitch. The second MCS includes SpeI, NotI and PstI restriction sites.

Figure 8: First MCS includes EcoRI, NotI and XbaI restriction sites, followed by the xplB and xplA genes, which encode RDX degradation enzymes, each with a ribosomal binding site. The second MCS includes SpeI, NotI and PstI restriction sites.

Figure 9: σ32 Heat Shock inducible promoter, MCS includes EcoRI, NotI, XbaI, SpeI, NotI and PstI restriction sites (standard iGEM prefix and suffix). The circuit is closed with BBa_B0010 termination sequence.
Two controls were made, one with the riboswitch (Figure 5) to simply test for detection. The second control was ordered in case the riboswitch control does not give out a signal. If this second control (Figure 6) does not give out a signal either, we can conclude that the mistake was in the in-silico assembly of the sequence. However, if the first control does work, we can proceed with the degradation tests by cutting and cloning the sequence in Figure 7 into the control sequence shown in Figure 5. This is why multiple cloning sites were added, so fragments could be added or removed at will. As for the circuit in Figure 8, this one was ordered in case the riboswitch gave problems and degradation wanted to be tested without having to detect first. Finally, the sequence shown in Figure 9 will be used once we upscale our operations to a batch bioreactor for the degradation tests that will be handled by the engineering team.
MOVING FORWARD

The only construct that could be successfully synthesized was the one containing the degradation proteins with a ribosomal binding site (Figure 2), as the bacterial colonies did not grow well otherwise. However, we tested RDX detection—previously tested in LB with negative results—using the RDX riboswitch in M9 1× media and observed activation. This confirms that Device 1 effectively detects RDX, as indicated by the AmilGFP signal, which turned yellow upon RDX detection. Future experiments are needed to determine the RDX degradation rate and quantify its efficiency. Additionally, studies should investigate the effects of RDX on bacterial growth, since bacteria grown in glucose-free medium with RDX appeared to utilize it as a carbon source. Evaluating both short- and long-term effects will be essential.
References
[1] D. K. Summers, "The kinetics of plasmid loss," Trends in Biotechnology, vol. 9, no. 1, pp. 273–278, 1991. [Online]. Available: https://doi.org/10.1016/0167-7799(91)90089-Z
[2] D. Hanahan, "Studies on transformation of Escherichia coli with plasmids," Journal of Molecular Biology, vol. 166, no. 4, pp. 557–580, 1983. [Online]. Available: https://doi.org/10.1016/S0022-2836(83)80284-8
[3] M. L. Mayo, J. O. Eberly, F. H. Crocker, and K. J. Indest, "Modeling a synthetic aptamer-based riboswitch biosensor sensitive to low hexahydro-1,3,5-trinitro-1,3,5-triazine (RDX) concentrations," PLoS One, vol. 15, no. 11, e0241664, 2020. [Online]. Available: https://doi.org/10.1371/journal.pone.0241664
